

DP KVM Installer User Guide
Overview
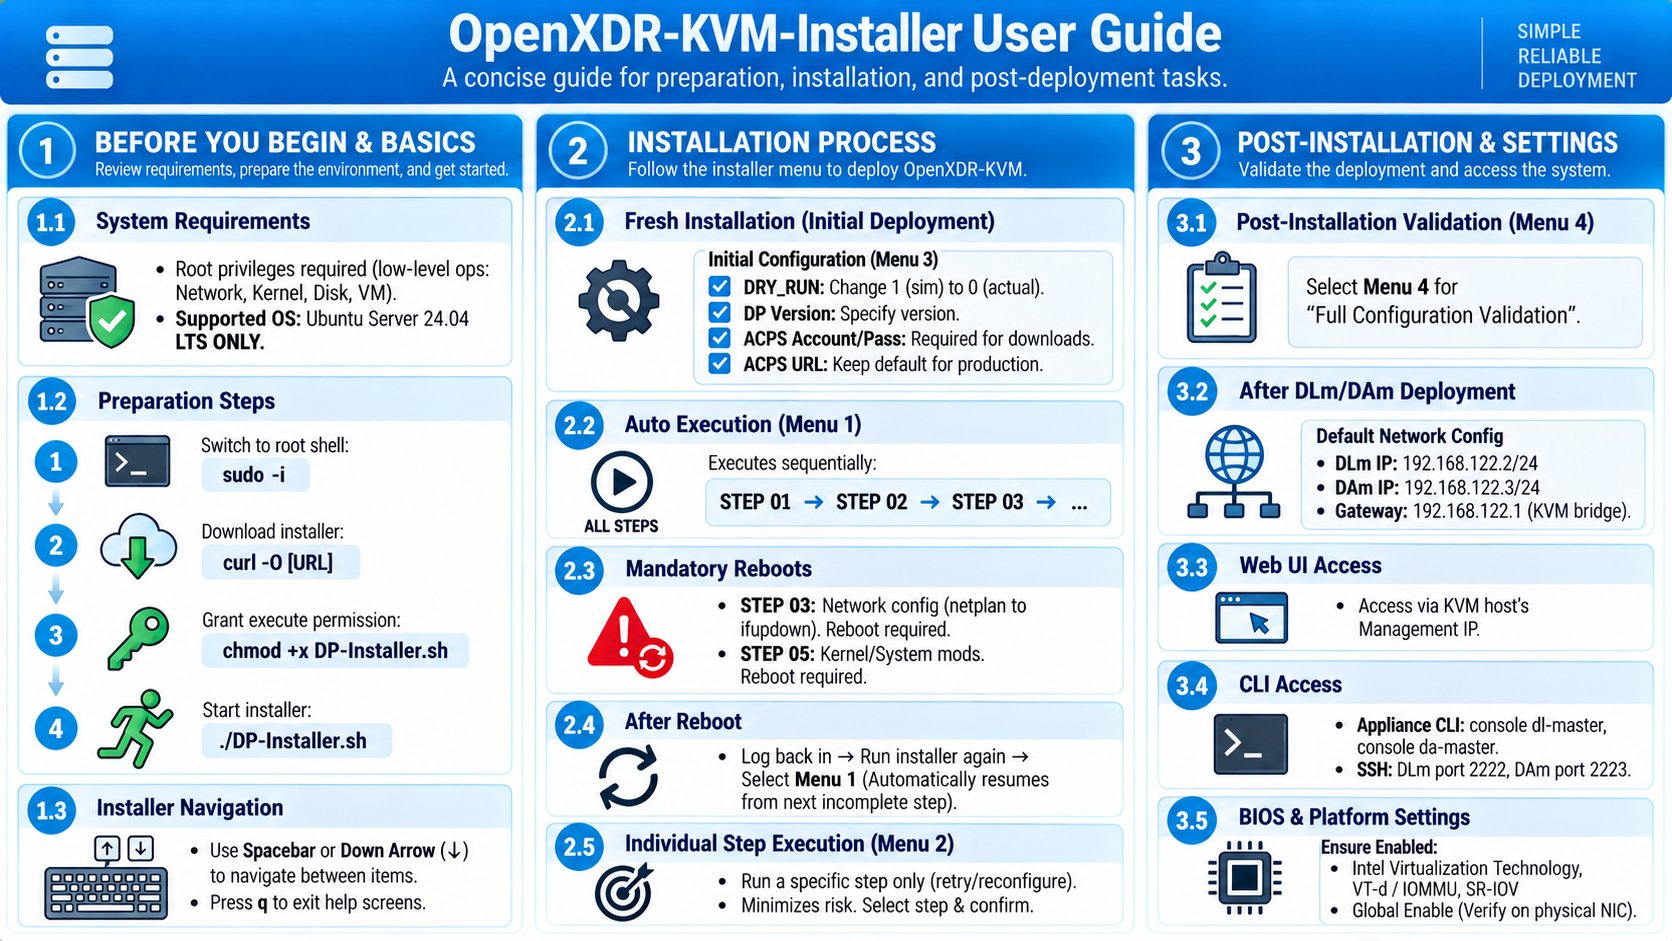
Use this page as the complete DP deployment runbook. It contains the DP-specific hardware baseline, KVM installation workflow, reboot/resume behavior, VM deployment, and the required DL/DA appliance configuration after the VMs are created. The documented baseline is Ubuntu Server 24.04 LTS. For a compact post-deployment-only view, see DP Cluster Initial Configuration.1. System Architecture
Validated Dell PowerEdge R650 / R660 / R670 Configuration
Hardware at a Glance
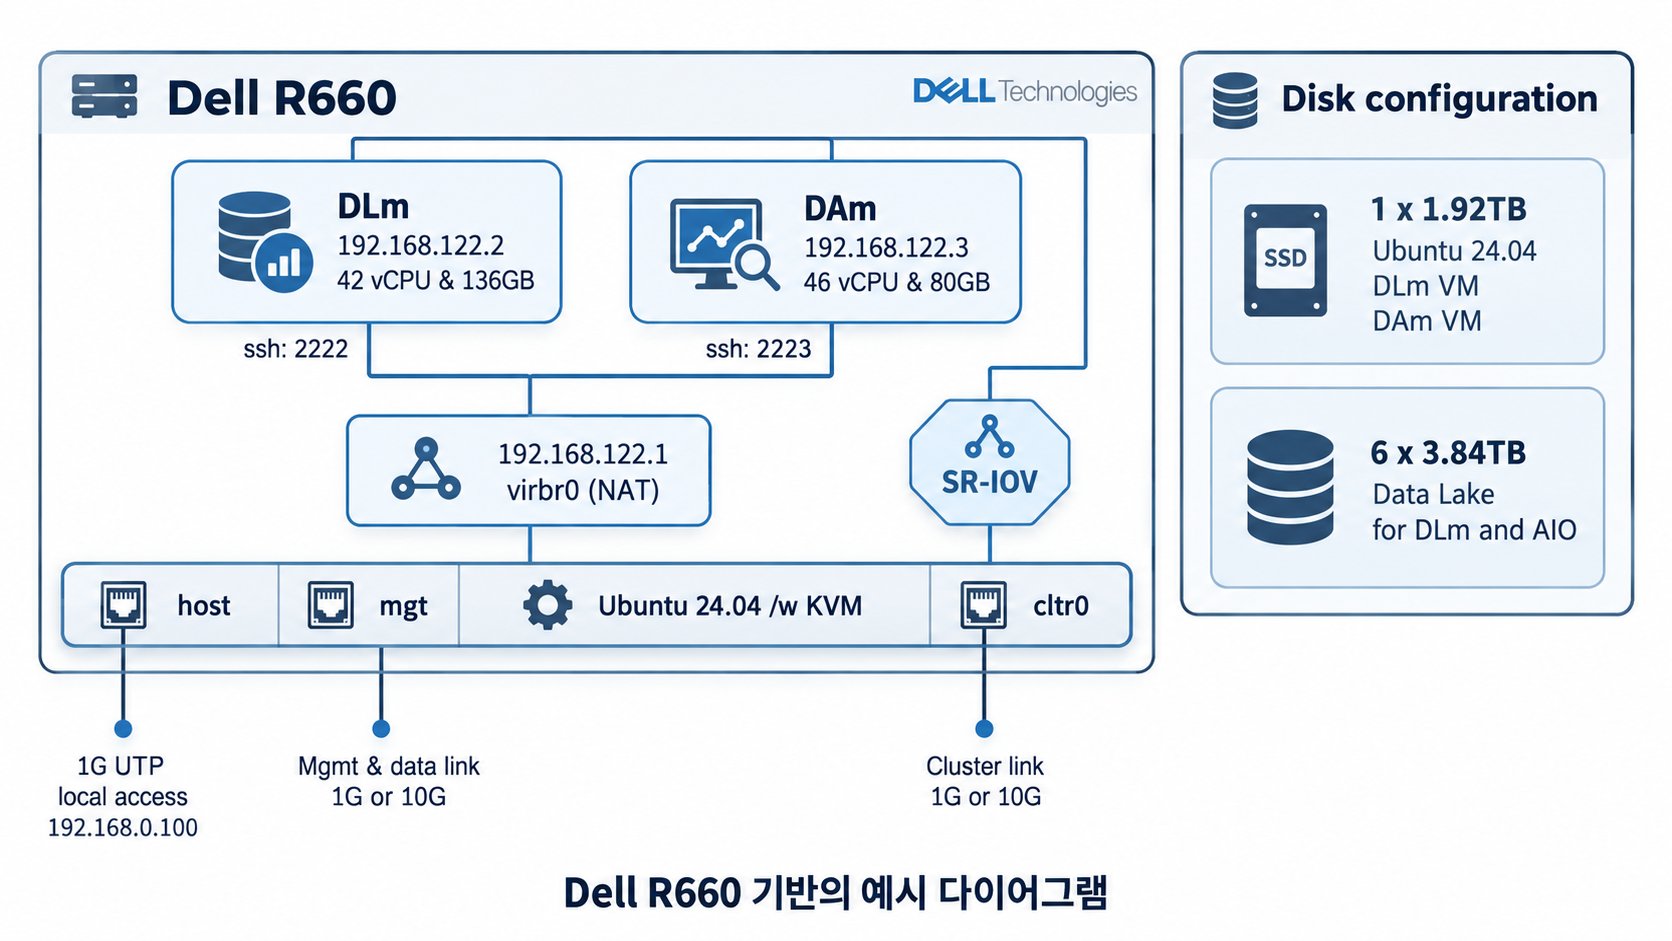
TheDP-Installer.sh workflow has been validated on Dell PowerEdge R650, R660, and R670 servers. The following values are the current DP defaults and documented deployment sizing example.
These are installer defaults and a validated deployment example, not a universal Stellar Cyber sizing rule. Confirm production sizing for the expected ingestion rate, retention, and workload.
Architecture Overview
Stellar Cyber OpenXDR Platform is deployed on a single physical server using KVM virtualization. The installer automatically creates and configures:- Ubuntu 24.04 KVM host
- libvirt / qemu-kvm virtualization layer
- DLm (Data Lake Master) virtual machine
- DAm (Data Analyzer Master) virtual machine
- Linux bridges and SR-IOV-based high-performance networking
- dedicated storage volumes for system and data workloads
- host OS preparation and tuning
- network topology creation
- storage layout
- virtual-machine lifecycle management
- performance-related configuration such as CPU affinity and SR-IOV attachment
2. Pre-Installation Preparation
System Requirements
Before running the installer:- root privileges are required
- network reconfiguration
- kernel and system tuning
- disk and filesystem configuration
- virtual-machine creation and modification
Documented Operating System
- This guide is based on Ubuntu Server 24.04 LTS.
- The current
DP-Installer.shmay retain compatibility paths for earlier DP/Ubuntu releases. For legacy deployment, verify the current source and target-release support separately.
Preparation Steps
- Switch to a root shell.
- Download the installer into the current directory.
- Make it executable.
- Run the installer.
Management NIC
The Management NIC is used for:- remote access to the KVM host
- access to DLm and DAm web interfaces
- external management and data traffic
Cluster NIC
The Cluster NIC is dedicated to internal DP cluster communication. With SR-IOV, the NIC can be attached directly to the VM while bypassing the virtual-switch layer for maximum performance. Requirements:- SR-IOV-capable NIC
- 10GbE or faster
- commonly Intel X710 or E810 series
Host Access NIC
The Host Access NIC is for local-only maintenance and troubleshooting. Characteristics:- default IP:
192.168.0.100 - not reachable from remote networks
- used for on-site access, emergency recovery, and KVM troubleshooting
NIC Preparation and Design Guidance
Before running the installer, physically connect the NICs that will be used. The installer identifies interfaces using link state, so connected cables help distinguish NIC roles during selection.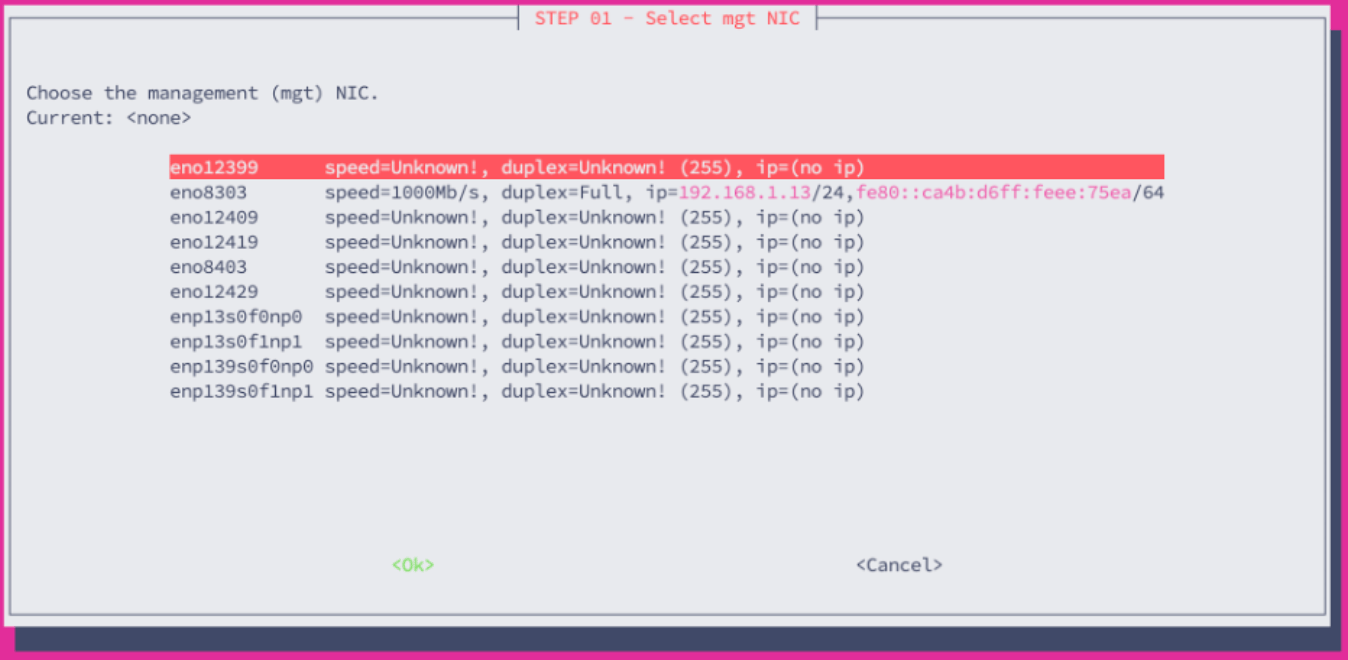
3. Installer Navigation
The installer provides an interactive menu interface implemented with Whiptail.Navigation
- Spacebar or Down Arrow (↓): move through menu items
- Enter: select
- q or ESC: exit a help screen or return to the previous menu
State-Aware Execution
The installer is state-aware. Installation state is stored under:- completed steps are recorded
- after a reboot or interruption, execution resumes from the next incomplete step
Mandatory Reboot Steps
The installer automatically reboots after:- STEP 03 – Network conversion (netplan → ifupdown)
- STEP 05 – Kernel and system-level tuning
- log in to the server again
- relaunch the installer
- select Menu 1
Main Menu Overview
1. Auto Execute All Steps
- runs all steps beginning with the next incomplete step
- resumes after reboot from the last completed step
- recommended for:
- initial installation
- continuing after reboot
2. Select and Run Specific Step Only
- runs one selected step independently
- recommended for:
- DP VM redeployment
- network changes
- image updates
- storage reconfiguration
3. Configuration
Configures installer parameters:DRY_RUN(default:1)DP_VERSIONMGT_NICCLTR0_NICDATA_SSD_LISTCLUSTER_NIC_TYPE- ACPS credentials
- username
- password
- URL
4. Full Configuration Validation
Validates the complete system configuration. Checks include:- KVM
- DP VMs
- networking
- SR-IOV
- storage
5. Script Usage Guide
- shows the built-in usage guide
6. View Log
- displays the installer log
7. Exit
- exits the installer
4. Installation Scenarios
The installer supports:- new installations
- partially configured systems
4.1 New Installation
This scenario applies when the installer is run immediately after Ubuntu installation.Initial Configuration
From the main menu, select: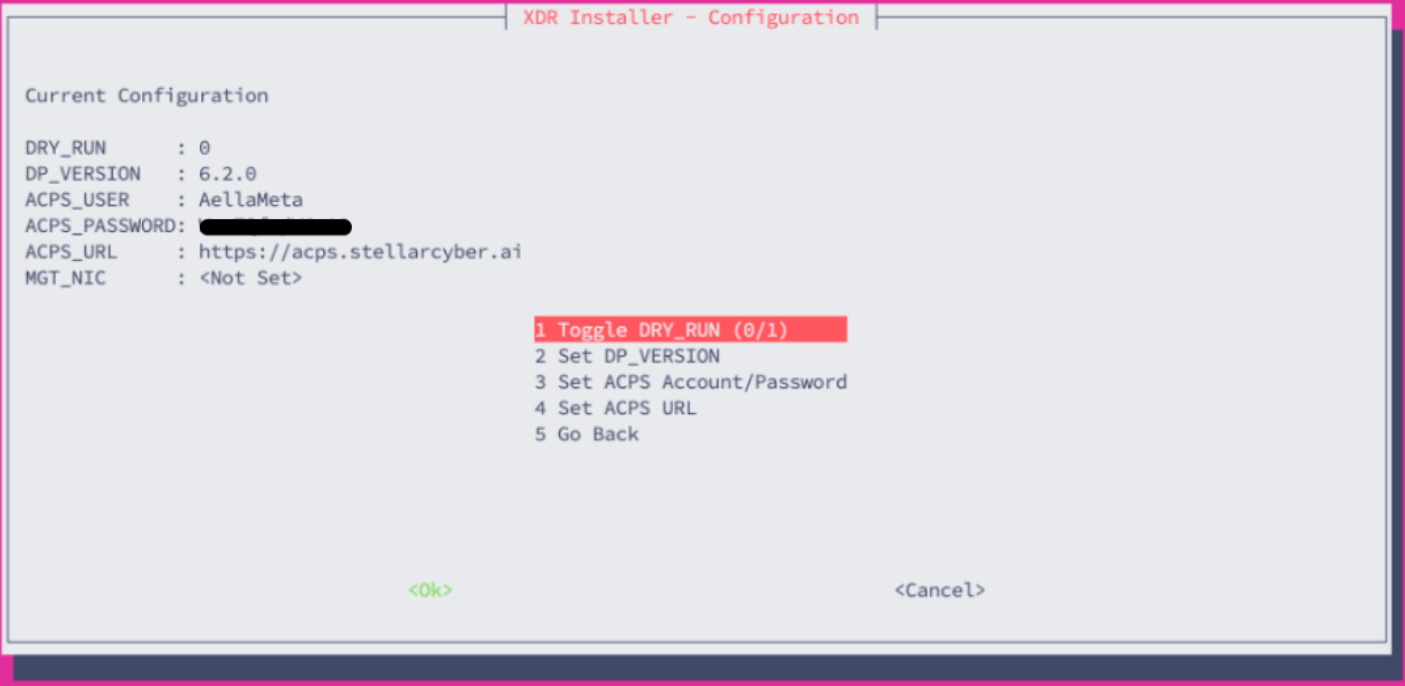
- DRY_RUN
- default:
1(simulation mode) - change to
0only when you are ready for real installation
- default:
- DP Version
- specify the Data Platform version to deploy
- ACPS Account / Password
- required to download the DP QCOW2 image and deployment files
- ACPS URL
- keep the default in production
- change only in development or POC environments
Auto Execute
Select: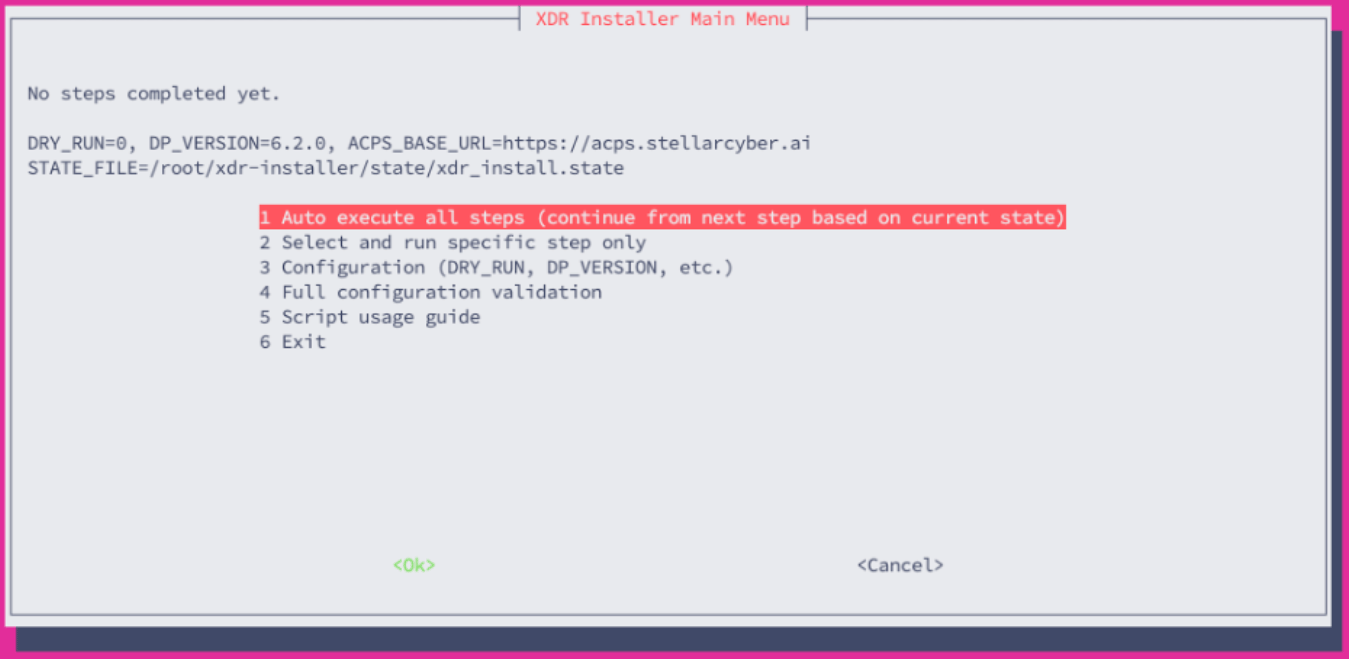
Mandatory Reboot Steps
STEP 03- converts network configuration from netplan to ifupdown
- requires reboot to apply the change
- applies kernel and system-level changes
- requires reboot for system stability
After Reboot
- log in again
- relaunch the installer
- select Menu 1
4.2 Run a Specific Step
This mode runs only one installation step without executing the entire workflow. It is intended for cases where:- one configuration needs to change
- a previously failed step needs to be retried
- one component must be redeployed or reconfigured
Common Use Cases
- redeploy DLm / DAm VMs
- redownload DP images or deployment scripts
- reconfigure or reattach SR-IOV interfaces
- reapply CPU affinity and performance tuning
How to Run a Specific Step
From the main menu: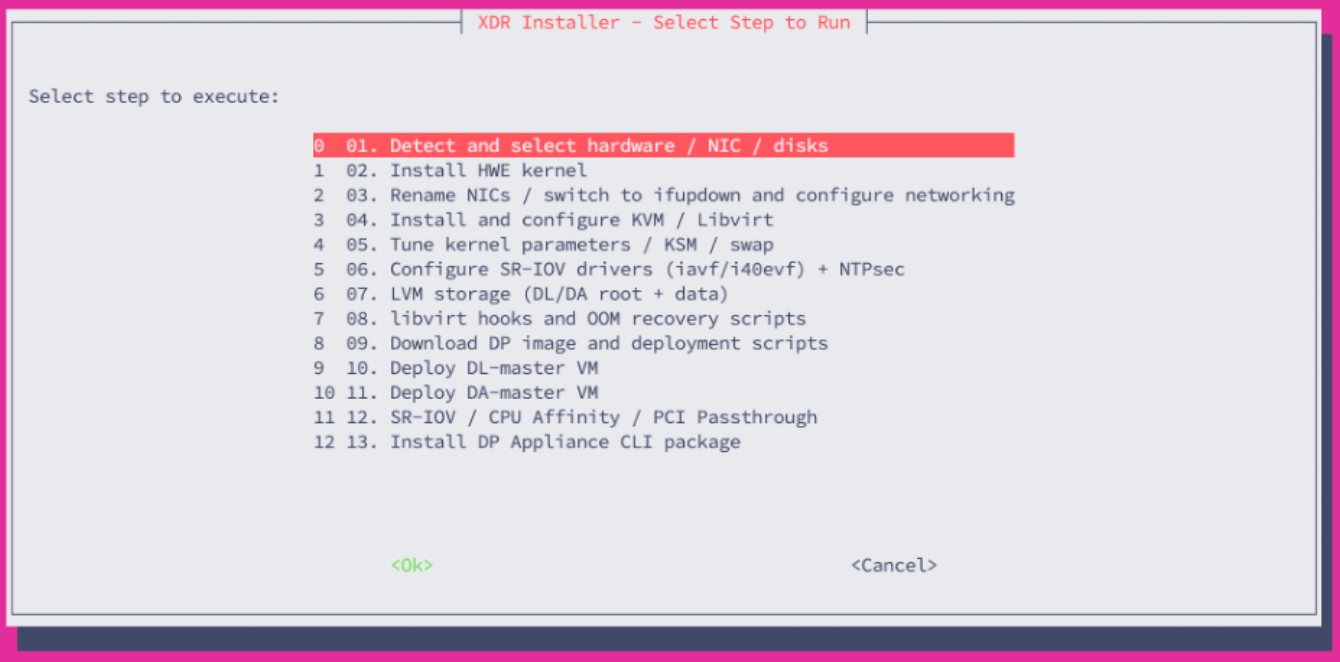
Execution flow:
- select the step
- confirm execution
- the selected step runs and returns to the menu
STEP 14 — NFS Backup Server
The final DP Installer step configures an NFS export for DP configuration backup. It is not a Data Lake data backup mechanism. The default configuration includes a/stellarcyber export path and allowed-client values based on the internal DL address. Review these values in Configuration before applying them to the target environment.
Important Notes
- some steps depend on previous steps
- for example, CPU affinity requires the VM to exist
- if a step fails because a prerequisite is missing, rerun the required previous step first
- during troubleshooting, start with the smallest relevant step
5. Post-Installation Validation
After installation, select: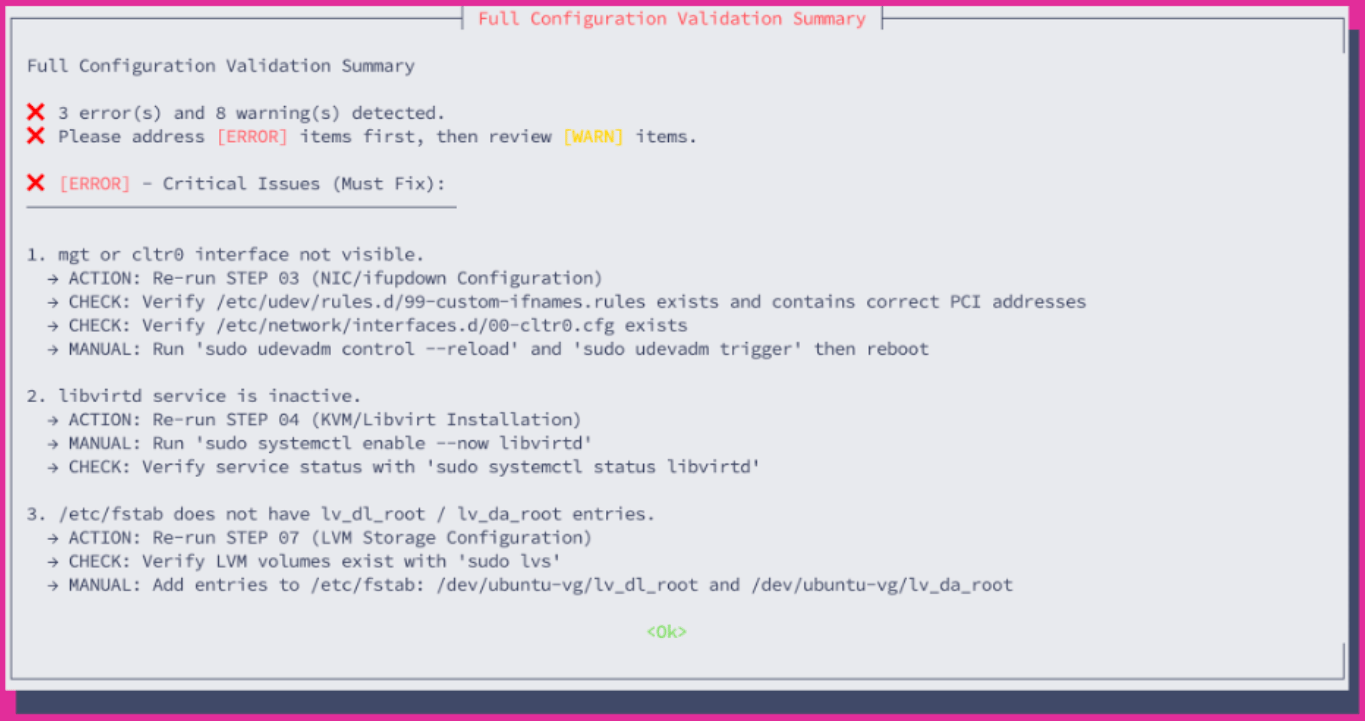
Validation Scope
- KVM and libvirt service status
- DLm / DAm VM status and autostart configuration
- network configuration
- bridges
- SR-IOV interfaces
- routing tables
- storage mount points and capacity
6. Common Post-Installation Changes
Automatic Reboot Notice
- STEP 03 always triggers a system reboot.
Change Scenarios
Change Management or Host Access NIC / IP
Rerun:Change Cluster NIC
Rerun:Redeploy DLm / DAm VM
Deploy a Different DLm / DAm Version
7. After DLm / DAm Deployment
Default Network Configuration
- DLm IP:
192.168.122.2/24 - DAm IP:
192.168.122.3/24 - Gateway:
192.168.122.1(KVM internal bridge)
Web UI Access
Use the KVM host Management IP to access the Data Platform web UI. Example:CLI Access
Appliance CLI:SSH Access
- DLm: port 2222
- DAm: port 2223
8. Hardware and Software Requirements
Before real execution, confirm all DP-specific prerequisites on this page:- Ubuntu Server 24.04 LTS for the documented procedure
- root access
- CPU hardware virtualization enabled
- VT-d / IOMMU enabled when using SR-IOV/direct device assignment
- sufficient CPU and memory for the current DL/DA VM defaults shown above
- sufficient OS/VM storage and dedicated Data Lake disks for the selected design
- Management NIC, Cluster NIC, and recovery/Host Access connectivity
- network access for package, image, and deployment artifact downloads
9. BIOS and Platform Configuration
Verify that these features are configured according to platform requirements:- Intel Virtualization Technology
- VT-d / IOMMU
- SR-IOV capability on the cluster NIC
10. Required DP Initial Configuration
The DP installation is not complete when the VMs are merely running. Complete the following DL/DA configuration before production use.The KVM NAT management network is fixed per host: DL uses
192.168.122.2/24, DA uses 192.168.122.3/24, gateway is 192.168.122.1, and DNS is 8.8.8.8. Different physical KVM hosts can reuse these NAT addresses because each host has its own local libvirt NAT network.10.1 DL Master
show interface all and continue:
10.2 DL Worker
Worker 1 example:dl-worker2 / 192.168.12.27/24.
10.3 DA Master / Worker
DA Master example:da-worker1 / 192.168.12.51/24.
10.4 Convert DA Resource to DA-Master
When DL Master is System Ready and the intended DA Master reportsresource:
- Open the Data Platform GUI.
- Go to System → DATA MANAGEMENT → Resources and verify the DA resource is ready.
- Go to System → DATA MANAGEMENT → Data Analyzer.
- Create a Data Analyzer cluster.
- Select the DA resource and set Role in Cluster to DA-Master.
- Submit and verify the node becomes healthy.
10.5 Receiver and Sensor Profile
- Open System → DATA SOURCE MANAGEMENT → Receivers.
- Confirm Receiver Hostname points to DA-Master, not DL-Master.
- Confirm at least one Sensor Profile points to the receiver.
- If
show logforwarderhas no output, check Receiver Hostname first.
10.6 DP Final Checklist
- DL/DA VMs are running and autostart is enabled.
- DL management IP is
192.168.122.2/24; DA management IP is192.168.122.3/24. - Every cluster node has a unique hostname and cluster IP.
- The actual cluster interface was selected from
show interface all. - All nodes use the DL Master cluster IP as CM; this guide uses
192.168.12.25. - The intended
vdbstorage is added where required. - DA-Master is healthy in Data Analyzer.
- Receiver Hostname points to DA-Master and the Sensor Profile points to that receiver.
- Full Configuration Validation has no unresolved FAIL.