

Sensor KVM Installer User Guide
Overview
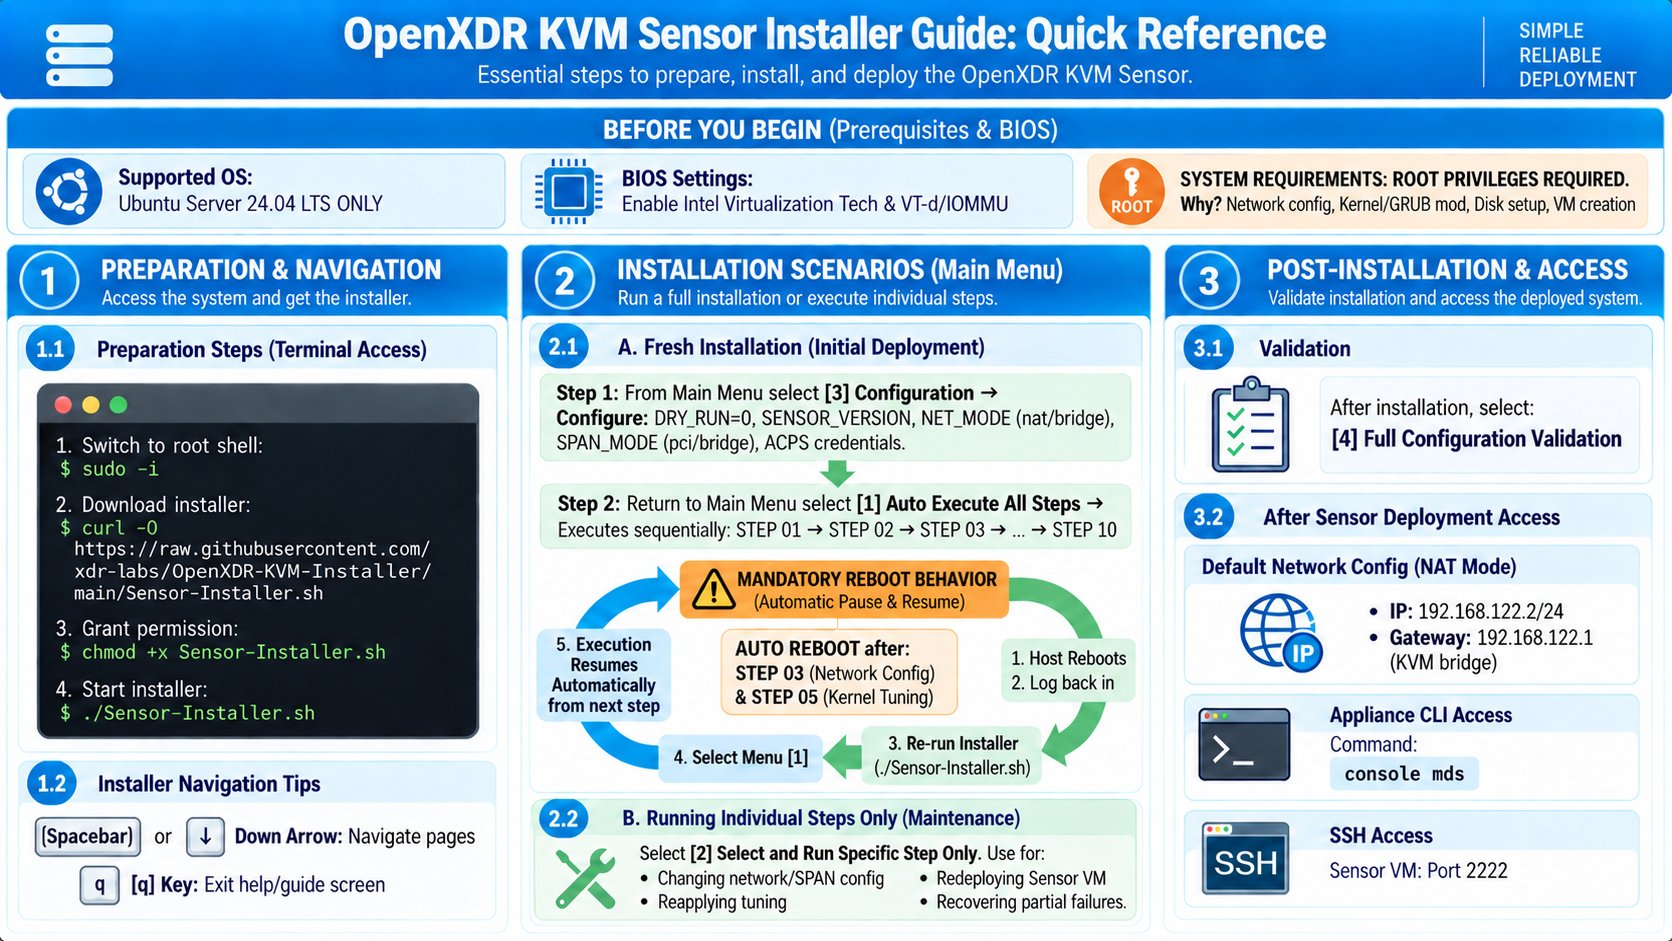
Use this page as the complete standalone Sensor deployment runbook. It includes Sensor-specific hardware sizing, NAT/Bridge choices, SPAN attachment, installer execution, and the required Sensor registration and authorization steps. The documented baseline is Ubuntu Server 24.04 LTS.1. System Architecture
Hardware at a Glance
These values are the project starting baseline, not a universal production sizing rule. Increase resources according to traffic volume and workload.
Architecture Overview
Stellar Cyber XDR Sensor is deployed as a single virtual machine on a physical server using KVM virtualization. The installer automatically configures:- Ubuntu 24.04 KVM host
- libvirt / qemu-kvm virtualization layer
- XDR Sensor virtual machine
- NAT or L2 bridge-based Sensor networking
- PCI-passthrough-based SPAN traffic collection
- dedicated LVM-based storage
- kernel and CPU performance tuning
- host OS preparation and performance tuning
- network topology configuration
- storage provisioning
- Sensor VM lifecycle management
- high-speed packet capture using PCI passthrough
2. Pre-Installation Preparation
System Requirements
Before running the installer:- root privileges are required
- the installer performs system-level operations including:
- network changes
- kernel and GRUB modification
- disk and filesystem configuration
- virtual-machine creation and modification
Documented Operating System
- This guide is based on Ubuntu Server 24.04 LTS.
- The source installer may retain compatibility code for older Ubuntu releases. For legacy deployment, verify the current source and the support scope of the target OpenXDR release separately.
Preparation Steps
- Switch to a root shell.
- Download the installer into the current directory.
- Make it executable.
- Run the installer.
3. Sensor Network Modes
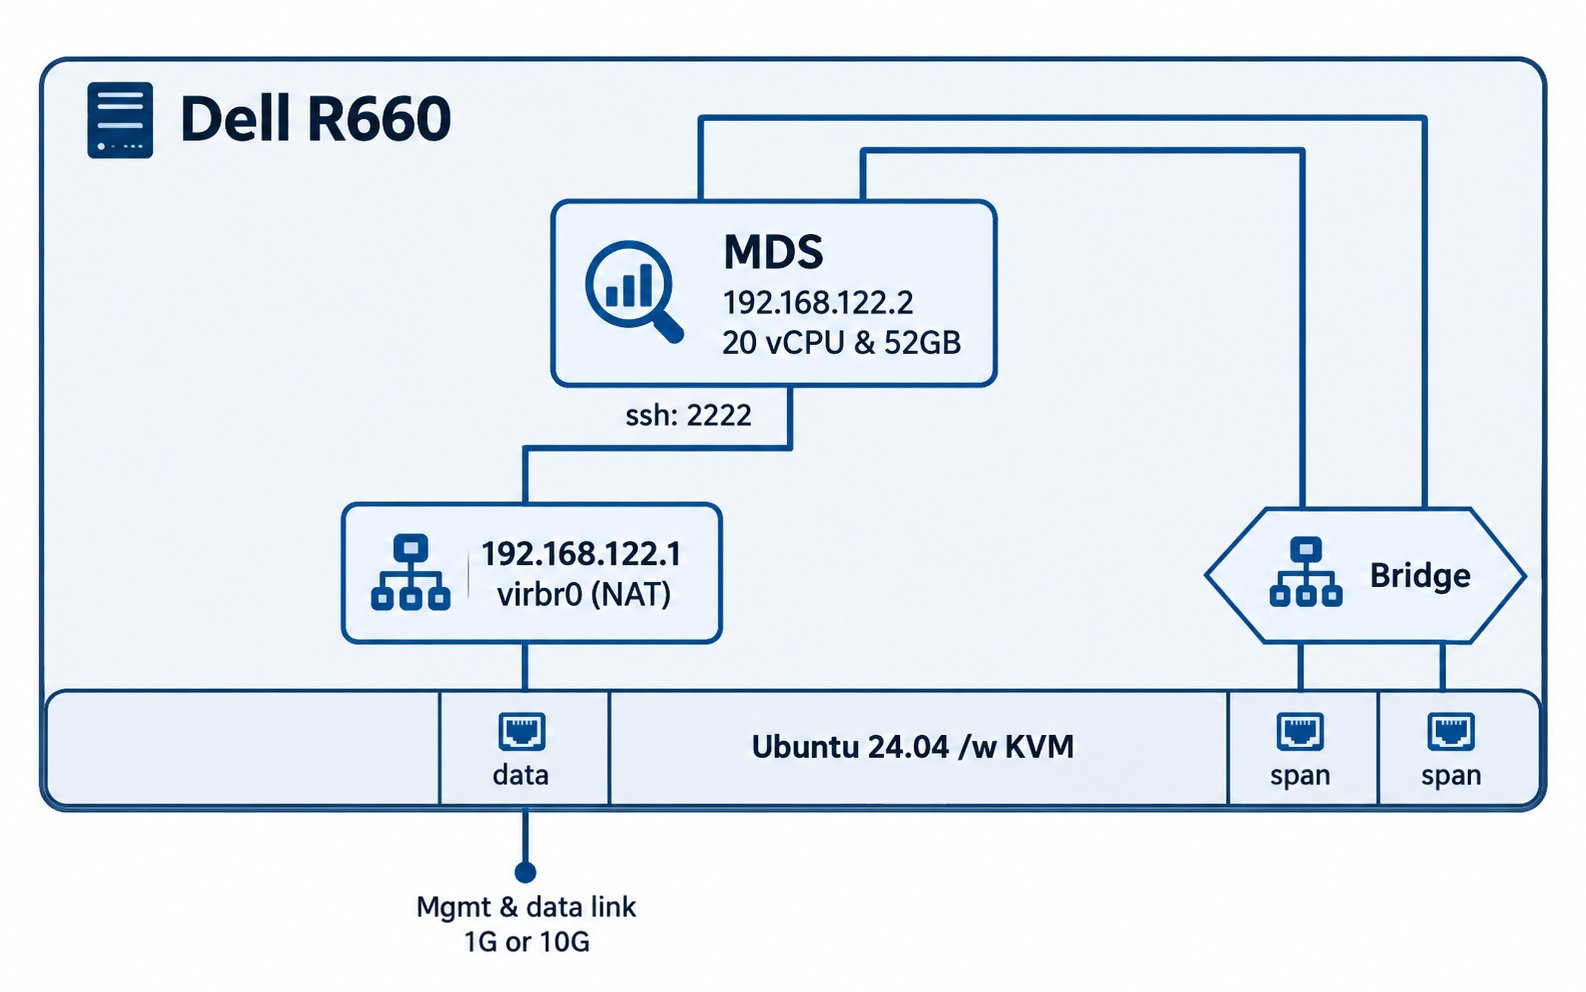
The installer supports two Sensor network modes for different operational requirements.NAT Mode
- the KVM host and Sensor VM share one external IP address
- uses the libvirt internal NAT network (
virbr0) - assigns a fixed internal address to the Sensor VM
- default:
192.168.122.2
- default:
- requires additional operational consideration because:
- external access is indirect
- port forwarding and management traffic flow must be considered
Typical Use Cases
- lab, POC, and production environments
- simple deployments with limited external exposure
- environments with limited IP address resources
The management interface can use NAT mode while SPAN NICs use Bridge mode.
Bridge Mode
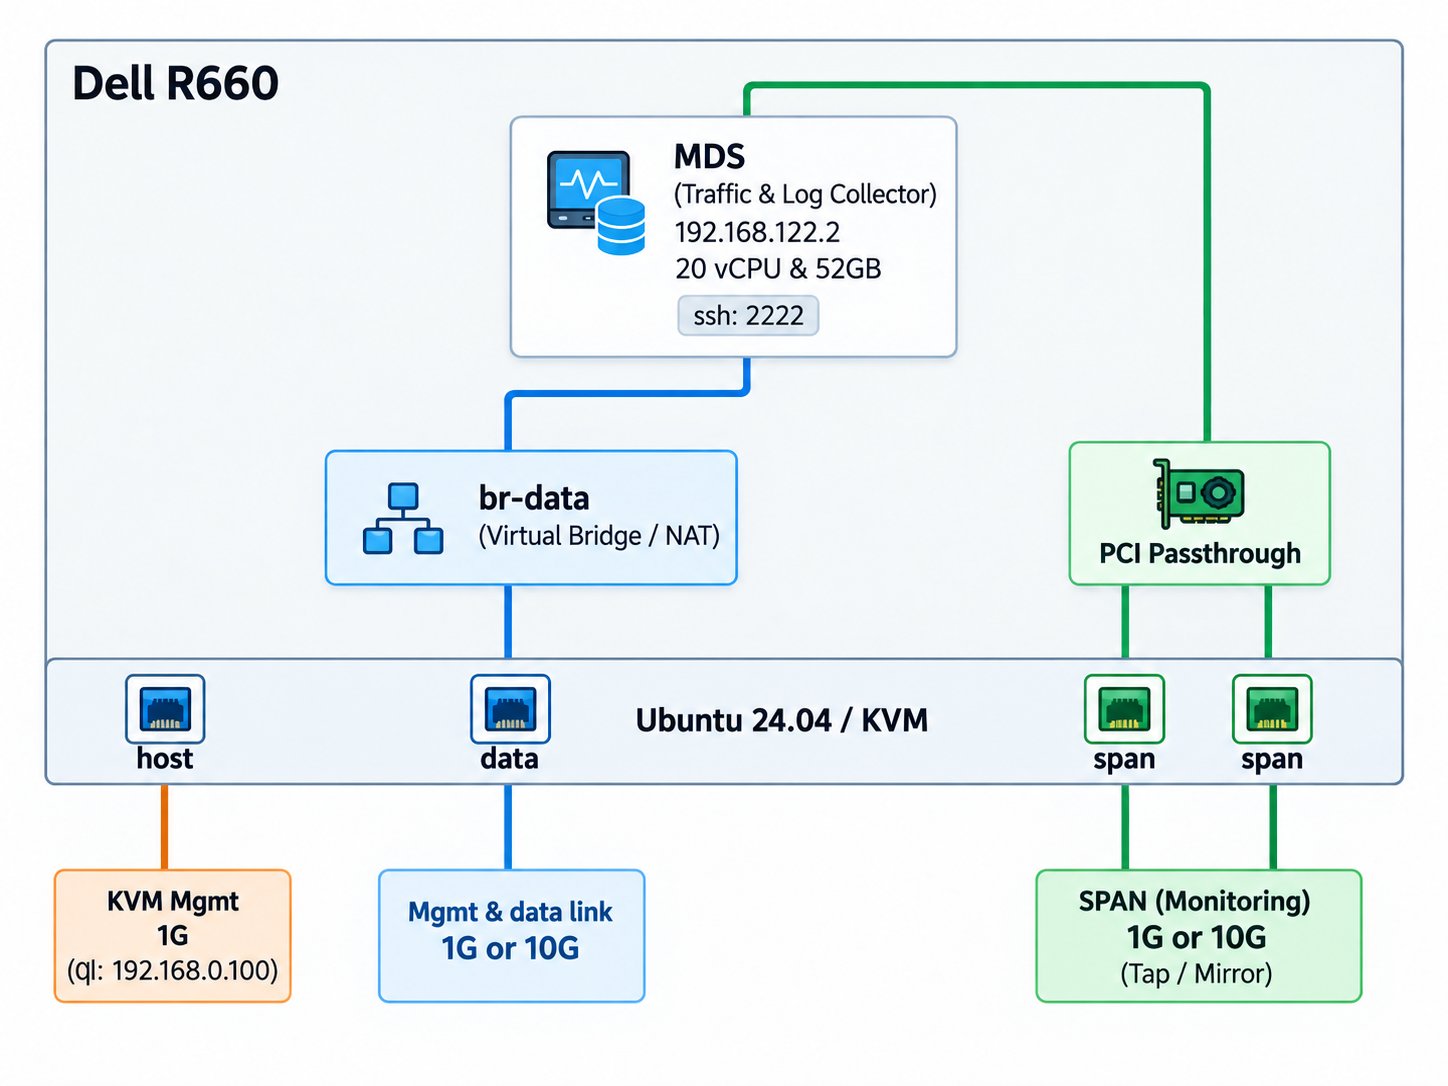
- the Sensor VM connects through a dedicated L2 bridge
- Sensor traffic is separated from the KVM host
- requires a high-performance physical NIC
- Appliance CLI cannot apply ACLs to the Sensor bridge
Recommended Use Cases
- high-throughput Sensor deployments
- environments using 10GbE or faster interfaces
- environments requiring strict separation between host and Sensor interfaces
- production deployments of performance-sensitive Sensor nodes
The management interface can use Bridge mode while SPAN NICs use PCI Passthrough.
4. SPAN Attachment Methods
The installer supports two SPAN attachment methods.PCI Passthrough (Default)
- passes a physical SPAN NIC directly to the Sensor VM
- provides maximum packet throughput and minimum latency
- completely bypasses the virtual-switch layer
Key Characteristics
- uses standard PCI passthrough
- requires IOMMU to be enabled in BIOS
- default and recommended for most physical environments
Bridge Mode (SPAN)
- connects SPAN traffic through an L2 bridge
- primarily used in:
- private-cloud environments
- virtualized or nested-virtualization environments
- environments where PCI passthrough is restricted
NIC Preparation and Design Guidance
Physically connect the NICs required by the deployment before running the installer. The installer identifies interfaces using link state, so connected cables make NIC roles easier to distinguish.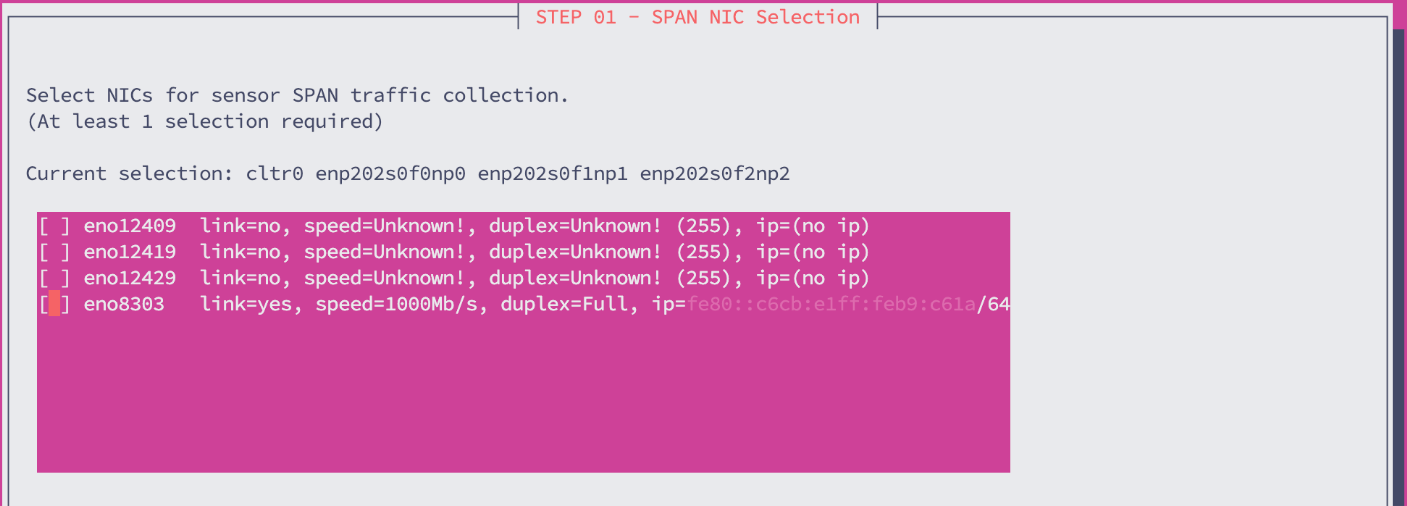
5. Installer Navigation and Execution Model
Menu Navigation
The installer provides an interactive menu-driven interface.- Spacebar / ↓: scroll forward
- ↑: scroll backward
- q: exit a help or guide screen
State-Aware Execution
Execution state is stored under:- resume automatically after reboot
- skip already completed steps
- safely rerun a selected step
DRY-RUN Mode
- default:
DRY_RUN=1 - operations are simulated
- no real system changes are applied
Main Menu Overview
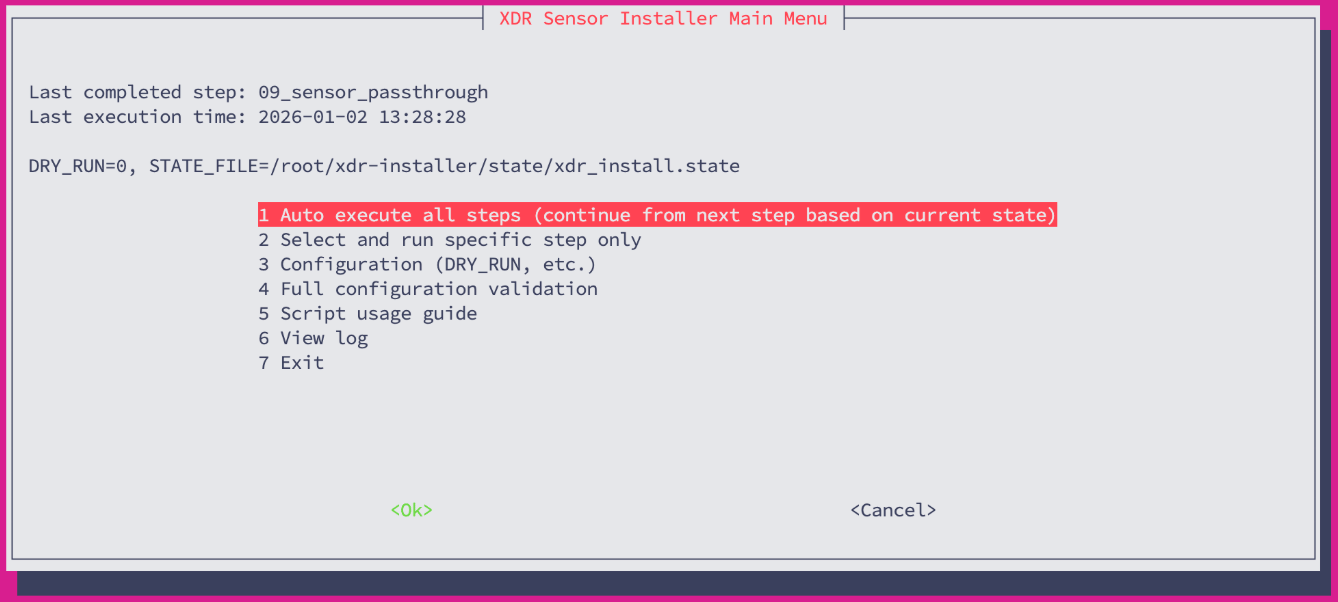
1) Auto Execute All Steps
- runs all steps beginning with the next incomplete step
- resumes after reboot from the last completed step
- recommended for:
- initial installation
- continuing after reboot
2) Select and Run Specific Step Only
- runs one step independently
- recommended for:
- Sensor VM redeployment
- network changes
- image updates
- SPAN changes
3) Configuration
Configures:DRY_RUN(default:1)SENSOR_VERSIONSENSOR_NET_MODE(nat/bridge)SPAN_ATTACH_MODE(pci/bridge)- ACPS credentials
- username
- password
- URL
4) Full Configuration Validation
Validates:- KVM
- Sensor VM
- networking
- SPAN
- storage
5) Script Usage Guide
- displays the built-in help guide
6) View Log
- displays the installer log
7) Exit
- exits the installer
6. Installation Scenarios
6.1 New Installation
From the main menu:- select 3) Configuration
- configure:
DRY_RUN = 0SENSOR_VERSIONSENSOR_NET_MODE(nat/bridge)SPAN_ATTACH_MODE(pci/bridge)- ACPS credentials
- 1) Auto Execute All Steps
Mandatory Reboots
The host is automatically rebooted after:- STEP 03 – network configuration changes
- STEP 05 – kernel and system tuning
- log in again
- relaunch the installer
- select Menu 1
6.2 Run a Specific Step
Select:- 2) Select and Run Specific Step Only
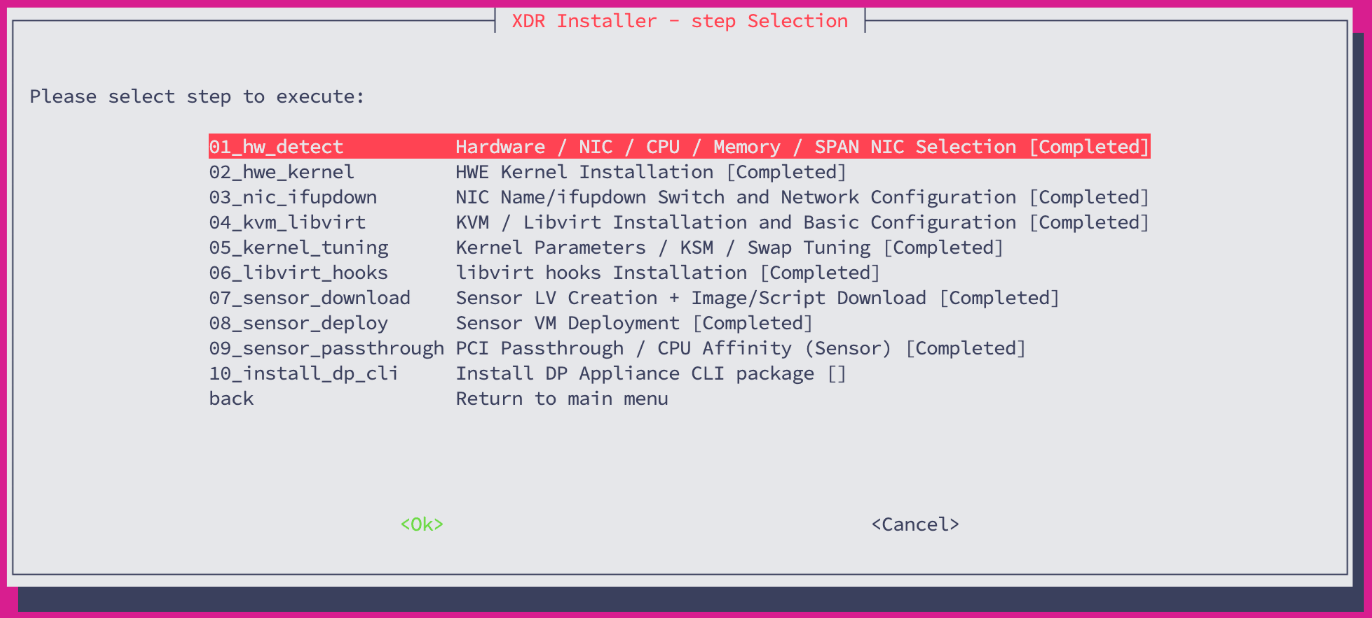
- network or SPAN changes
- Sensor VM redeployment
- reapplying tuning or hooks
- recovery from a partial failure
7. Post-Installation Validation
After installation, select:- 4) Full Configuration Validation
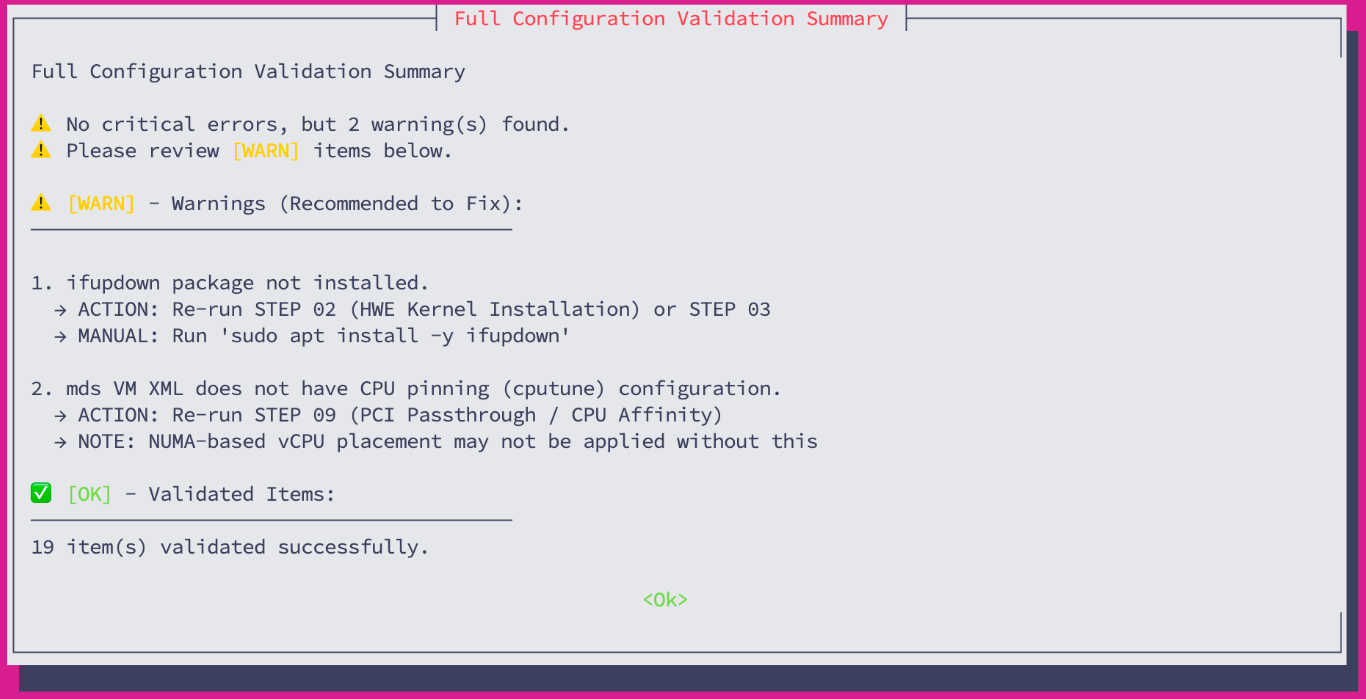
Validation Scope
Validation checks:- kernel and IOMMU configuration
- NIC and interface status
- KVM and libvirt service status
- Sensor VM status and autostart
- network bridges and routing
- storage and mount points
- system tuning parameters
8. Common Post-Installation Changes
Automatic Reboot Notice
- STEP 03 always triggers a system reboot.
Change Scenarios
Change Management Network Mode (bridge ↔ nat)
- Sensor VM redeployment is required
- rerun:
Change SPAN Mode or NIC
Rerun:Changes While Keeping the Same Network Mode
Bridge mode- change
HOST_NICorDATA_NIC
- change only the
HOST_NICIP
- change
HOST_NIC(management uplink)
- change only the
HOST_NICIP
Change SPAN Attachment Method (PCI Passthrough ↔ Bridge)
Rerun:Redeploy the Sensor VM
Deploy a Different Sensor Version
9. After Sensor Deployment
9.1 Management Network
The standalone Sensor KVM Installer supports both NAT and Bridge management modes.NAT Mode
The Sensor VM uses the fixed KVM NAT address:- Sensor IP:
192.168.122.2/24 - Gateway:
192.168.122.1 - DNS:
8.8.8.8
Bridge Mode
Bridge mode uses the Sensor management IP, netmask, gateway, and DNS values selected during Installer configuration. Do not replace a Bridge-mode address with the NAT values above. If manual correction is required, use the values assigned to your environment:9.2 Log In and Change the Default Password
Open the Sensor console and log in with the initial credentials:9.3 Set a Unique Sensor Hostname
The hostname is displayed in Stellar Cyber and should be unique for each Sensor.9.4 Connect the Sensor to the Data Platform
Useset cm to configure the Stellar Cyber Platform management endpoint that this Sensor can reach.
For a clustered Data Platform, use the DL-master management interface address. For a single DP/AIO deployment, use the platform management IP address or hostname.
Examples:
For the standalone Sensor Installer,
set cm is not the Sensor’s local NAT address 192.168.122.2. It must be the reachable management address or hostname of the Stellar Cyber Platform.- CM Controller shows the intended Data Platform address or hostname.
- Status is Established.
9.5 Configure NTP and Timezone
Stellar Cyber strongly recommends configuring NTP and the correct timezone on the Sensor. Accurate time synchronization is important for event timestamps, correlation, and troubleshooting. Refer to the Stellar Cyber NTP and Timezone Best Practices for the supported procedure.9.6 Authorize the Sensor
After the Sensor registers with the Stellar Cyber Platform, authorize it before using it for production data collection. Refer to the Stellar Cyber Sensor authorization documentation.9.7 CLI and SSH Access
Appliance CLI:- Sensor VM: port 2222
10. Hardware and Software Requirements
Before real execution, confirm:- Ubuntu Server 24.04 LTS
- root access
- 12 vCPU or more and 16 GB memory or more as the project starting baseline
- at least 100 GB free in
ubuntu-vg - a Management NIC and the required SPAN/data NICs
- CPU virtualization enabled
- VT-d/IOMMU enabled when using PCI Passthrough
- network access for packages and Sensor image downloads
- console or out-of-band access before network conversion
11. BIOS and Platform Settings
Verify that these BIOS options are enabled:- Intel Virtualization Technology
- VT-d / IOMMU
12. Sensor Final Checklist
- Full Configuration Validation has no unresolved FAIL.
- Sensor VM is running and configured to autostart.
- NAT mode uses
192.168.122.2/24; Bridge mode uses the environment-specific management address. show interfacesreports the expected management configuration.- Sensor hostname is unique.
set cmpoints to the reachable Data Platform management address, not the Sensor’s own NAT IP.show cmreports Status: Established.- NTP/timezone are configured.
- Sensor authorization is complete in Stellar Cyber.
- SPAN interfaces use the intended PCI Passthrough or Bridge design.